|
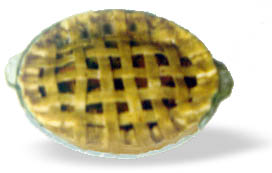
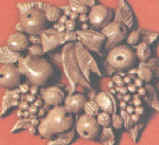
Potpourri Pie
This is both a decorative and a functional project. This pie REALLY appears to be a freshly baked pie when completed! The large quantity of potpourri gives it's aroma for a very long time. We feel you will enjoy having as well as making this "Potpourri Pie" It also make a great gift!
Supplies:
- One aluminum foil pie pan
- Two squares of tan craft felt
- 1/3 yard of pale pink net or tulle (optional)
- Scissors
- Glue gun
- Any 1 quart size of dry potpourri in fruit or spice scent such as, apple, peach, cinnamon or a combination that you like.
- White craft glue
- Cinnamon spice in shaker
- Small paint brush
Step 1
Lay pie pan upside down on netting and trace a circle 1 Inch outside the pie pan border. Cut the netting on this line.
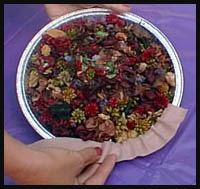
Heap your favorite potpourri in the pie tin, then lay netting over it. Using your glue gun, tack netting to rim in at least 8 places. This will secure the netting to the pie tin and keep the potpourri in place.
Step 2
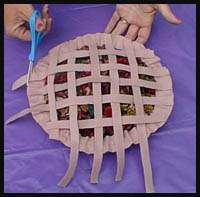
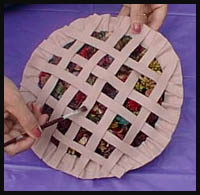
Cut 2 strips, each 1 inch wide from long side of the tan felt. Then glue this strip to the rim of the pie plate.(over the netting) Pinch and ruffle as you glue to resemble pie crust edge. You may use all the felt strips, depending on how much you pinch and ruffle. If this happens cut more and continue around the edge until completed.

Step 3
Next, cut 3/4 inch strips from long side of felt. Begin the lattice top for pie by laying first strip across middle of pie. Glue down both ends. Trim off any excess and save. Lay next lattice piece over top of first piece and perpendicular to first, and place off center by I inch. Then glue both ends down.
Step 4
Lay next strip 1 inch over from first lattice strip that placed down and weave over and under lattice already in place. Do not glue.....It is easier to continue weaving and alternating lattice before tacking down the remaining strips. You may have to cut more strips.
Step 5
Dip a wet paintbrush into thinned white craft glue and very lightly brush over lattice top and crust. While glue is wet, gently shake cinnamon over top to give the pie a "browned" appearance.
Note:Place your finished pie in a glass deep dish pie plate. Keep it on your stove top, the pilot light or oven vent will spread the delicious aroma
Bread Dough Wreath
Equipment: Mixing bowl; plastic wrap; cookie sheet; aluminum foil; rolling pin; toothpicks; fork; knife; wire rack; paintbrush for varnish or shellac.
Materials: Bread dough recipe below; whole cloves; varnish or shellac; epoxy cement.
Bread Dough Recipe: 4 cups flour; 1 cup salt; 1 1/2 cups warm water; 1 tsp. instant tea (heaping).
Mix the flour and salt together. To the 1 1/2 cups warm water, add 1 heaping teaspoon of plain instant tea. Dissolve well; let cool. Add liquid tea to flour mixture; mix very well with hands. Knead until smooth. Roll into ball; cover with plastic wrap.
Directions: Cover cookie sheet with aluminum foil. Preheat oven to 300° F.
Pinch off a large piece of dough; roll into a long sausage shape, then shape into a circle on cookie sheet. Wet ends and press together. Circle may be any size you desire, but keep in mind how much dough you have left with which to add ornamentation. Our wreath, without decorations, has approximately an 8" outer diameter with a 5" diameter center opening, and is about 1/2" thick.
To decorate wreath, pinch off pieces of dough and roll out with rolling pin or flatten with hands to about 1/4" thickness. Cut out leaf shapes with knife. Score each leaf with knife to mark the vein lines. Moisten back of each leaf with a little water; press on wreath. Make the largest fruit next (apples, pears, peaches). Press whole cloves into dough for stems and core ends of fruit: for stems of apples and pears, push clove bud into dough, leaving the stem end out; for the core ends of fruit, press in the stem end of the clove, exposing just the bud from which the ball of clove has been removed. Wet the wreath circle and attach the fruit pieces. Fill in spaces with clusters of grape, strawberry, nut, and a few plum shapes. Imprint texture and lines with toothpick or fork.
To make bow, roll out dough to 1/4" thickness; cut a long strip (20" x 24") about 1 1/4" wide. Fold and pinch strip into bow; cut away ends as illustrated. Place bow separately on foil-covered cookie sheet.
Bake wreath and bow in preheated 300° F. oven for 3 hours or until completely dry and hard (if bow is done before wreath, tear foil and remove bow from oven). Place on wire rack and let cool. Peel off foil. Leave on rack for several days in dry place.
Coat wreath and bow separately with varnish or shellac. When dry, cement bow to wreath, using epoxy cement as directed on package.
|  |
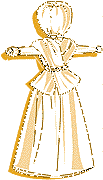
Make a Cornhusk Doll
Cornhusk dolls were toys for Native American and early American children. Each family had its own method of making dolls.
Today, cornhusk dollmaking is a craft kids can still do.
Materials:
4 cornhusks
Scissors
String (cut into 6 pieces, each 12 inches long)
Making the doll:
Dolls can be made in only a few steps. Here is one of the easier dolls to make. First, you'll need to remove four husks, the coverings for an ear of corn. Soak them for at least a half-hour in warm water. Remove from the water. Now you're ready to start. You may want some adult help. You also may want to make some practice dolls first.

1.Trim one corn husk to about 5 inches long, roll up and tie on each end.

2.Put two large cornhusks together and tie them together.

3.Separate the husks and pull them over the tied end and tie again. This makes the head of your doll.

4.Part the husks in the center and slide the rolled cornhusk in between them and as close to the head as you can.

5.Tie the loose husks below the rolled husks to make the doll's waist and skirt.
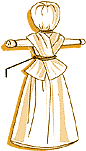
6.Fold the last cornhusk and drape it over the doll's shoulders and tie at the waist to make a shawl. Trim the bottom of the skirt and shawl and loose strings.
Source: Henry Ford Museum, Greenfield Village
Graphic by Martha Thierry
Seashell Soap Dish
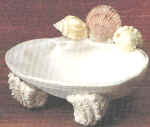
We have had so many requests for seashell crafts. Here is one that is so simple to make yet transforms into a lovely soap dish.
Materials:
Assorted seashells (see photo above)
All purpose white glue
Instruction:
There are a variety of seashells that work great for different projects. Some of these are olive, volutes, tulips, augers, clam and snail. Arranged with patience, many crafts can be created with these seashore finds.
1. View photo above carefully and design your soap dish as closely as possible.
2. Using a large shell as the base (dish), glue the smaller shells in a design onto the back of the large shell, with shell top facing front.
3. Use 3 similar shaped shells for pedestal feet. Glue one to center back of dish shell toward bottom and two in front as shown in photo. Be certain that all feet are glued evenly to base shell so that the dish will sit even. That's it! Enjoy
|
