|
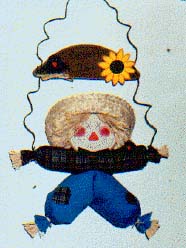
Harvest Time Scarecrow
By: Alexandra Bleicher
Finished size: 15 tall
Skill level: beginner
Crafting time: less than 2 hours, excluding drying time
This little fellow wont scare away your friends and family, but welcome them with his country charm. Hang him on your front door or in your entry. Few materials required; wooden pieces, fabric scraps, raffia, wire, fiberfill stuffing, hat and paint. Project is simple to paint with some dry brushed detailing. Material cost is under $10.00.
Materials
- Wooden pieces: 2 x 5 ¾ wing banner; 2 ¾ disk or frozen juice can lid, *1/16 thick pieces: 7/8 teardrops, four (crow wings); 7/8 hearts, two (crow bodies); ¾ circles, three (crow heads and sunflower center); 7/8 ovals, twelve (flower petals)
- 5 straw hat
- Raffia
- 19 gauge craft wire 30 length
- ¼ black satin ribbon, 12 length
- Fabric scraps: 5 x 8 brown plaid, 5 x 10 light blue
- Black fine tip permanent marker
- Fiberfill stuffing, small amount
- ¼ black snaps, two
- *Acrylic paint: Linen, Glazed Carrot, Burgundy, Licorice, Burnt Umber, Sunny Yellow, Buckskin Brown
*Forsters ® Woodsies and FolkArt® Acrylic paints by Plaid ® Enterprises were used for this project.
Supplies: scissors, glue gun and glue sticks, paintbrush, toothpick, paper plate, paper towel, pencil.
Instructions
- Paint pieces as follows: banner Buckskin Brown, ovals Sunny Yellow, one small circle Buckskin Brown, large disk Linen and remaining pieces Licorice. Let dry. Dry brush banner edges with Linen.
- Face. Using picture as guide dry brush cheeks on linen disk with Burgundy, paint triangular nose in Glazed Carrot and let dry. With black marker draw mouth, eyes and stitch lines around nose. Wrap a few strands of raffia around four fingers, remove loops and tie center with another piece of raffia knotting to secure. Cut lopped ends and glue knot to center top of face. Glue hat to top of head.
- Hands and feet. Take one strand of raffia and wrap around two fingers, remove loops from fingers and tie one end with a small piece of raffia. Trim untied end. Repeat three more times. Set aside.
- Top. Cut two ¾ 1 square patches from brown plaid fabric. Cut remainder into a 4 x 8 rectangle. Fold fabric piece with right side in and glue long sides together to form a tube, let cool. Turn tube right side out and stuff with fiberfill stuffing. Glue one hand, knotted side in to each end of tube. Cut two 3 lengths from raffia and tie sleeves. Glue to bottom back of face. Cut a 7 length from black ribbon, tie into a bow and glue to center front neckline.
- Pants. With right sides together glue long sides of blue fabric, let cool. Turn tube right side out and stuff with fiberfill stuffing. Cut two 3 length of raffia. Glue one foot into each end of tube and tie with raffia. Bend pants into a 90o angle and secure with a dab of glue between legs. Hold in place while cooling. Glue one patch to each pant leg. Glue center top of pants to center bottom of top. Wrap remaining length of black ribbon around waist for belt, secure with glue.
- Crows. Dry brush edges of all Licorice pieces with Buckskin Brown. Glue rounded end of two teardrops to pointy end of one heart, then glue one Licorice circle on top of teardrops. With Glazed Carrot paint beak and dot eyes with Wicker White, let dry. Use black marker to draw nostrils. Repeat with second crow. Glue one crow to right shoulder of scarecrow and second crow to left side of banner. Tie a length of raffia into a multi loop 1 ½ bow, glue below crow on banner for nest.
- Sunflower. Dry brush edges of Buckskin Brown circle with Burnt Umber and edges of Sunny Yellow circles with Glazed Carrot. Glue petals all around circle and glue flower to right side of banner.
- Hanger. Wrap one end of wire around left wrist of scarecrow. Loosely wrap the next 8 of wire around pencil to curl. Thread wire through left hole of banner. Now loosely wrap approx. 10 of wire around pencil to curl. Thread wire through hole on right side of banner. Curl remaining wire around pencil and wrap end around right wrist of scarecrow.
- Finishing. With black marker write Harvest Time on center of banner. Wrap one end of wire around left wrist of scarecrow. Loosely wrap wire the next 8 of wire around pencil to curl.
Copyright 2000 Alexandra Bleicher
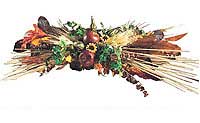
Harvest Wheat Centerpiece
Bring the beauty that is Fall into your home with this dramatic centerpiece. You can place this on your dining room table for holiday entertaining, or on a side table or mantle for a decorative accent.
Supplies:
- 2 pkgs. Blonde Wheat
- 1 pkg. Transparent Oak Leaves
- 1 pkg. Fall Eucalyptus
- 2 Chenille Stems, each cut in half (or use wire covered with floral tape)
- 4 Gourd Picks
- 2, 6" strands of ivy garland
- 3 Gifts From The EarthTM Apples
- 1 pkg. Dried Salal (lemon leaves)
- Glue Gun
Directions:
- Separate wheat into two groups. Hold one group under wheat heads. Secure cluster with chenille stem to create a binding point. Repeat for other group.
- Overlap the heads of the two wheat sheaf groupings. Use chenille stem to bind stems between wheat heads. (Remainder of wheat stems extends beyond other grouping's heads.)
- Cut apart oak and salal leaves, creating clusters. Position atop and beneath the wheat sheaf. Place stems of the leaves into the binding points to secure. Glue if necessary.
- Split eucalyptus in half. Place each group into a binding point, facing in the same direction as the wheat. Glue if necessary to secure.
- Add salal in the same fashion.
- Glue fruit to the wheat, leaves, and eucalyptus bundle. Apply glue directly to fruit and to stems of picks before inserting into centerpiece.
- Add ivy bunches to top. Glue in place.
Tip:
- When clustering wheat heads, be sure to twist chenille gently so wheat is not cut by the binding.
|
 |
|
|  | | |
|
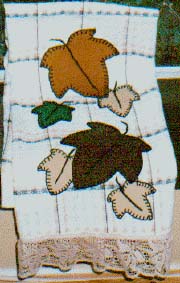
Fall Leaves Towel
By: Alexandra Bleicher
Finished size: 14 x 26
Skill level: beginner
Crafting time: less than 2 hours
What a great way to add a touch of autumn to your kitchen décor. This Accent towel is very simple to make, great for a beginner. It requires a few fabric scraps in green and shades of brown, 2 wide pre-gathered lace for trim, black embroidery floss, iron on fusible web and a tea towel. Two basic stitches are used; blanket stitch to outline leaves and stem stitch for stems. Trim can be sewed on by machine or hand. Project can be completed in less than 2 hours and cost is under $5.00
Materials
- White and beige tea towel
- Fabric scraps: dark brown 4 square; light brown, 4 square; beige 4 square; green 2 square
- Fusible web
- 1 ½ beige pre-gathered lace, 28 length
- Black embroidery thread
Supplies: embroidery needle, scissors, iron, beige thread, pins, sewing needle or sewing machine.
Instructions
1. Attach fusible web to back of fabric pieces. Trace patterns on paper backing, large leaf to dark and light brown, three small leaves to beige and one small leave to green fabric. Cut out leaves.
2. Remove backing from leaves. Using picture as placement guide arrange leaves on towel. Fuse into place with iron.
3. Embroidery. Use three strands of thread throughout. Stitch blanket stitch around leaf edges and stem stitch for stems.
4. Pin lace to bottom edge of towel folding edges over 1 and sew into place.
Copyright 2000 Alexandra Bleicher
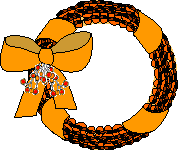
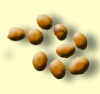
Acorn Wreath
I was standing outside enjoying the day last fall, when I noticed little acorns falling off the tree. I started collecting them in a shoe box thinking I could use them for something and it turned out to be a very lovely but creative idea. Of course, I suggest getting a wreath hanger because it is very heavy.
Parental supervision is recommended.
This project is rated AVERAGE to do.
What You Need
- Acorns
- Wicker wreath
- Hot glue gun
- Glue sticks
- Newspaper
- Flowers or other decoration
How To Make It
- First, spread the newspaper on a flat surface. Lay your wreath down flat. Heat your glue gun.
- Next, starting in the middle of the wreath begin gluing the bottom of the acorn. Place the glued part of the acorn in the middle of the wreath and stand the acorn straight up. Make 1 row in a straight line going all the way around the wreath. Repeat the process from top to bottom with the wreath still laying flat.
- Then decorate with flowers, bows, or even holiday ornaments. Be sure not to leave any open spaces except in the back. The back of the wreath shouldn't have any acorns on it so when you lay it down it is flat.
Pine Cone Bird Feeders
Give each child a pine cone, a piece of string, and a spreader. (Plastic knives make ideal spreaders.) Place a jar of health-food store peanut butter (no added sugar or preservatives) and a tray of bird seed at each table.
Ask children to tie their strings around the small ends of the pine cone. (Young children may need help.) Show them how to spread peanut butter along the surface of the pine cone, filling in the spaces along the lower two-thirds.
After cones are coated in peanut butter, roll them in bird seed. Finally, let each child take his or her feeder home and hang it up, or scatter the feeders in trees around the school. Enjoy watching the birds feast on a tasty treat!
A Step Further: Buy peanuts from a health food store. Slowly pour peanuts into a blender to make peanut butter as students watch. You may need to add a little peanut oil to improve consistency of the peanut butter. Let students sample the freshly-made peanut butter before sharing it with the birds. WARNING: CHECK WITH PARENTS BEFORE DOING THIS. SOME CHILDREN MAY BE ALLERGIC TO PEANUTS!
Easy Dried Apple Crafts
By: Brandie Valenzuela
Do you remember the last time you were in someone's home that had an apple pie baking in the oven? Ahhh, the aromas of a fresh baked pie -- it is simply irresistible!
Well, now you can recreate this delicious scent in your own home, or in the homes of your loved ones, by making dried cinnamon scented apple crafts. None of them are hard to make and results are wonderful! Hang one of these on your wall and you will surely impress all of your
guests.
For each apple craft, you will need
- Juice of approximately 8-10 lemons
- 2 teaspoons salt
- 8 - 10 large firm apples
- 8 teaspoons cinnamon
- 2 teaspoons allspice
- 1 teaspoon cloves
- 8" - 10" sturdy, heavy gauge wire (for a wreath)
- Jute (for garland or apple stacker)
- 1 - 1 1/2 yards of ribbon or fabric scraps
To prepare and dry your apples
- Place lemon juice in a large bowl, and stir in salt.
- Peel, core, and slice apples horizontally into 1/4" thick circles. Soak slices in lemon juice bowl for approximately 6-10 minutes, making sure each side of the slices has a chance to absorb some of the lemon juice.
- Meanwhile, mix spices in a bowl and blend well.
- Remove the slices from the bowl and place them on paper towels. Pat tops of apple slices with paper towels.
- Dust apples slices with spice mixture. Turn slices over and repeat on opposite side.
- Place apples slices in a single layer on a baking sheet. Bake at 150-200 degrees F for 6 hours or until completely dried. Apple slices should be slightly pliable.
To Create An Apple Wreath
1) Fold each apple slice in half, and then into quarters and thread the apples slices onto the wire. Continue to pack on the folded apples until the wire is completely filled.
2) When the wire is completely covered, use pliers to bend ends into hooks so that they can connect and close. Carefully shape wire into desired shape. I recommend either a circle or heart shape.
3) Using your ribbon or fabric scraps, create a hanger for your wreath. 4) Hang on your wall, or package as a gift for someone special.
To Create An Apple Garland
Cut of enough jute for your desired length of garland - remember, your apple garland shouldn't be too long, but approximately 2-4 works well. Also, it is always better to have too much, than not enough.
2) Start stringing on apple slices. Push one end of jute through the middle of each apple slice.
3) Consider alternating several apple slices and then a piece of tied on fabric strip.
4) Hang on your wall!
To Create An Apple Stacker
1) Using an approximate 12" piece of jute, tie one end to about three cinnamon sticks that are laid in a a bundle.
2) Being to string on apple slices by pushing jute through the center of each slice. Consider alternating several slices with a piece of fabric tied on.
3) When apple stacker is the desired length, end with three more cinnamon sticks in a bundle and tie a loop so that you can hang your apple stacker proudly!
©2001 Brandie Valenzuela
|
|
|